|
|
| Line 28: |
Line 28: |
| | == Search == | | == Search == |
| | | | |
| − | Search is one of the most important functionalities in the gCube system. Depending on the collections you want search through you can perform different kinds of searches. The default option is to search for a term anywhere in the selected collections, or you can search for more specific criteria. There is also the option to browse the contents of a collection and their distinct values based on a specific criterion.<br>
| + | See [[Search User Guide]]. |
| − | After performing a search you can refine its results by searching for more specific terms in the current results. In order to perform a search or a browse, you first have to select collections. For this purpose you have to use the Select Collections portlet.
| + | |
| − | Independently of the search type all results are displayed by the Results portlet.<br>
| + | |
| − | | + | |
| − | === Select Collections ===
| + | |
| − | By using this portlet, you can select the desired collections in order to browse or search them.<br>
| + | |
| − | The collections are presented in a tree hierarchy. The first level of nodes represents a collection group and each group contains several collections. In the following image, f.i. '''''Aquamaps''''' is a collection group. On the left of each checkbox, there is either a close folder icon or an opened folder icon. If there is a ''closed folder'' icon, it means that there are other collections inside this group of collections. By click on it, you can see the underlying collections. On the other hand, if there is an ''opened folder'' icon, it means that the node is expaned and you already see the inner collections (like '''''AquaMaps: Class Biodiversity Maps'''''). So, if you click on it, you can hide them.<br>
| + | |
| − | In order to select/deselect a collection, you have to click on its name or checkbox. Additionally, you can select a group of collections simply by selecting the group of collections they belong to. As you can see below, if you select the '''''Aquamaps''''' collection group, then all the collections that belong to this group are selected.<br>
| + | |
| − | [[Image:Collections.png]]<br><br> | + | |
| − | A full description for each collection is available, if you click on ''(more)'' link. A pop up window appears containing a description of the corresponding collection as you can see in the image above.
| + | |
| − | For each collection you can see its name, description (if it exists), number of records and the creation date.<br>
| + | |
| − | | + | |
| − | For your flexibility you can search through the available collections for a keyword that may be included in collections name and/or description. The following image displays this functionality.
| + | |
| − | [[Image:SearchColls.png]]<br><br>
| + | |
| − | The collections that you have already selected, are also selected at the pop-up window with the search results. You can deselect the already selected collections or select new collections. By clicking on the results at the pop-up window this change will also be applied at the collections tree.<br><br>
| + | |
| − | | + | |
| − | === Search ===
| + | |
| − | The search portlet is divided into 3 different tabs. The ''''Search'''', the ''''Browse'''' and the ''''Refine Search'''' tab. Each tab provides different functionality and will be described below.<br>
| + | |
| − | | + | |
| − | ==== Search panel ====
| + | |
| − | | + | |
| − | After selecting the collections you want to search in, the search functionalities are enabled based on the current selections. The Search panel is displayed and there you have two different options.
| + | |
| − | You can type the search terms you want to search for and click on the ''''Search'''' button or you can click on the 'Advanced search options' link which will display the advanced interface. If you use the first option this will search for the given terms everywhere inside the selected collections. <br><br>
| + | |
| − | [[Image:Search.png]]
| + | |
| − | <br><br>
| + | |
| − | If you use the second option, this will enable the advanced search. In the advanced search you can:
| + | |
| − | * Choose the language to be used
| + | |
| − | * Add as many criteria as you like.
| + | |
| − | * Define the field to be used in each criterion. If ''''Any'''' is selected this will search everywhere inside the selected collections.
| + | |
| − | * Decide if all or any of your criteria should be matched. The default option is to match any of the given criteria.
| + | |
| − | * Click on the ''''Search'''' button to submit the search.
| + | |
| − | * Click on the ''''Reset'''' button to reset the current criteria.
| + | |
| − | <br>
| + | |
| − | [[Image:AdvancedSearch.png]]
| + | |
| − | <br><br>
| + | |
| − | | + | |
| − | You can add a new condition by clicking the '''Add Condition''' ('''+''') button or you can delete a condition by clicking the '''Remove Condition''' ('''-''') button.
| + | |
| − | Notice here that at least one condition is needed. If you try to delete it a warning message is displayed and nothing is happened.<br>
| + | |
| − | | + | |
| − | [[Image:Search2condsandsort.png]]
| + | |
| − | | + | |
| − | ==== Browse panel ====
| + | |
| − | | + | |
| − | If browse panel is enabled you can browse the selected collections by one of the available criteria.<br>
| + | |
| − | You have two options either to browse the contents of the collections, or to get the distinct values of the selected criterion.<br>
| + | |
| − | | + | |
| − | [[Image:BrowsePanel.png]]
| + | |
| − | <br>
| + | |
| − | You can select the order of the results and specify how many results you would like to be displayed per page.<br> The number of results per page cannot be more than 50. If you try to request for a bigger number a warning message is displayed and the default value is again added<br>
| + | |
| − | | + | |
| − | ==== Refine Search panel ====
| + | |
| − | | + | |
| − | The refine search panel is not enabled based on the selected collections. It provides two different functionalities:
| + | |
| − | * Refine the results of the searches submitted in the current working session
| + | |
| − | * Submit queries you have saved in your workspace
| + | |
| − | | + | |
| − | ===== Refine the results of submitted queries =====
| + | |
| − | | + | |
| − | First you should select which of the last results you want to refine. The already submitted queries are added to a drop down list and the latest is preselected.<br>
| + | |
| − | Then you can add as many criteria as you like and click on the ''''Refine'''' button.<br>
| + | |
| − | | + | |
| − | [[Image:RefineSearchQueryDesc.png]]<br><br>
| + | |
| − | | + | |
| − | For each selected query you can see the initial query that was submitted and the initial results at the results portlet.<br>
| + | |
| − | [[Image:RefineExplainLinks.png]]
| + | |
| − | <br><br>
| + | |
| − | | + | |
| − | ===== Submit queries from user's workspace =====
| + | |
| − | | + | |
| − | When you submit a search you can save the submitted query to your workspace (This functionality is provided by the results portlet). Then whenever you like you can resubmit any of these queries and see its results.<br>
| + | |
| − | In the refine search panel choose the '''Submit Query from basket'''. The basket with all the saved queries is displayed. Choose one of the queries and click on the ''''Search'''' button to submit the search.<br>
| + | |
| − | [[Image:SearchBasket.png]]
| + | |
| − | ----
| + | |
| − | | + | |
| − | === Common Browsing Activities ===
| + | |
| − | You can navigate throughout the results by using the arrows: ''previous'' and ''next''. <br>
| + | |
| − | For each result, you can see a set of information, retrieved from object's metadata. The record's presentation form is user configurable. You can select the prefered layout for results, by using the ''User Profile Editing'' portlet.
| + | |
| − | | + | |
| − | Each Information Object may have [[http://technical.wiki.d4science.research-infrastructures.eu/documentation/index.php/Common_Functionality#Metadata_Management Metadata]], Alternative representations, Parts and [[http://technical.wiki.d4science.research-infrastructures.eu/documentation/index.php/Common_Functionality#Annotations Annotations]]
| + | |
| − | If they exist, a further tab is shown next to the Tab Object.<br>
| + | |
| − | | + | |
| − | [[ File:Record.png|border|Figure 1. Single result having Metadata, Alternatives and Annotations associated to it. ]]
| + | |
| − | | + | |
| − | <br>
| + | |
| − | When Metadata, Alternative, Parts or Annotation tab is clicked an additional request is sent to the system in order to retrieve additional information. Once the request is complete it is possible to click on the retrieved information; a pop-up will be shown for visualizing the information to the user.<br>
| + | |
| − | | + | |
| − | [[ File:Metadata results.png |frame| Figure 2. Single result having Metadata tab clicked. ]]
| + | |
| − | | + | |
| − | In the case of Figure 2 the system shows that two metadata are associated to the result object, adding the Metadata Schema and Language for both of them. If the user clicks on one of the associated metadata a popup windows is shown displaying the metadata in both HTML Formatted and XML Formatted (as shown in the figure below)<br/>
| + | |
| − | | + | |
| − | [[ File:Md popup.png | border | Figure 3. Single associated Metadata clicked, a popup is shown ]]
| + | |
| − | | + | |
| − | <br>
| + | |
| − | | + | |
| − | [[ File:Right-menu.png |frame|set actions on each result by clicking on the D4Science Eye]]
| + | |
| − | Moreover, you can perform a set actions on each result by clicking on the D4Science Eye (The Icon on the right):
| + | |
| − | #''View Content'': Opens a popup window that contains, and displays the content.
| + | |
| − | #''Save Content'': Forces browser to ask to save the content in you local disk.
| + | |
| − | #''Manage Annotations'': You can add /remove / edit annotations for this object.
| + | |
| − | | + | |
| − | <br>
| + | |
| − | <br>
| + | |
| − | <br>
| + | |
| − | <br>
| + | |
| − | <br>
| + | |
| − | '''Move page results to basket and Move query to the basket features'''
| + | |
| − | | + | |
| − | Moreover once you get results it is also possible to use Move all the page results to the basket, to move the performed query to the basket and to display the collection name. The correspondent bottons are shown in the figure below:
| + | |
| − | | + | |
| − | [[ File:PAGEresults2.png | frame | Figure 4. Move page results to basket, move query to the basket and show collection name ]]
| + | |
| − | | + | |
| − | <br>
| + | |
| − | <br>
| + | |
| − | <br>
| + | |
| − | <br><br><br><br><br><br><br><br><br><br><br><br><br><br><br>
| + | |
| − | | + | |
| − | === The Basket ===
| + | |
| − | | + | |
| − | '''The Basket is thought of as a personal user area, dependent on which VRE is used''' .
| + | |
| − | The user can save its own preferred results by dragging them on it.
| + | |
| − | | + | |
| − | Drag operations can be performed by using the move hand next to each text.
| + | |
| − | | + | |
| − | | + | |
| − | It is also possible to drag a metadata, an alternative representation, a part or annotation (if any) associated to a result.
| + | |
| − | | + | |
| − | [[File:Basket2.png|frame|none|A Basket with Objects]]
| + | |
| − | | + | |
| − | | + | |
| − | Once you have chosen your results you have the possibility to '''make them persistent''' by clicking the save button on the header. The basket will be saved in your workspace.
| + | |
| | | | |
| | == Annotations == | | == Annotations == |
Revision as of 19:47, 12 December 2013
Workspace
A workspace represents a collaborative area in which users can exchange and organize information objects (items) according to their specific needs. Because of this, every user of any Virtual Research Environment is provided with this area. Such an area is further organized in workspaces and baskets as to resemble a classic folder-based file system. The information objects that can be managed via the workspace range from files to D4Science documents, i.e. compound objects comprising metadata, alternative representations and multiple parts. The modality a workspace is populated range from the dragging of D4Science documents (or part of them) to the upload of files from its desktop and the exchange of workspace objects among users.
Click here for more information
Login to VO/VRE
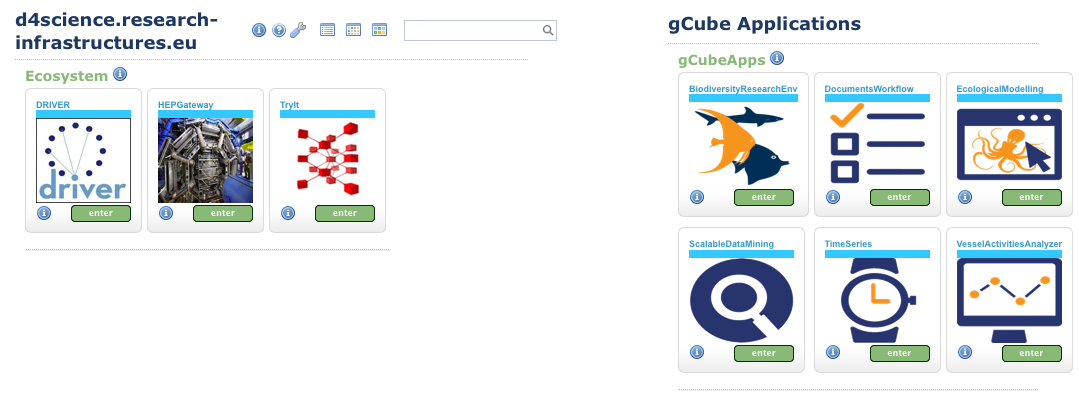
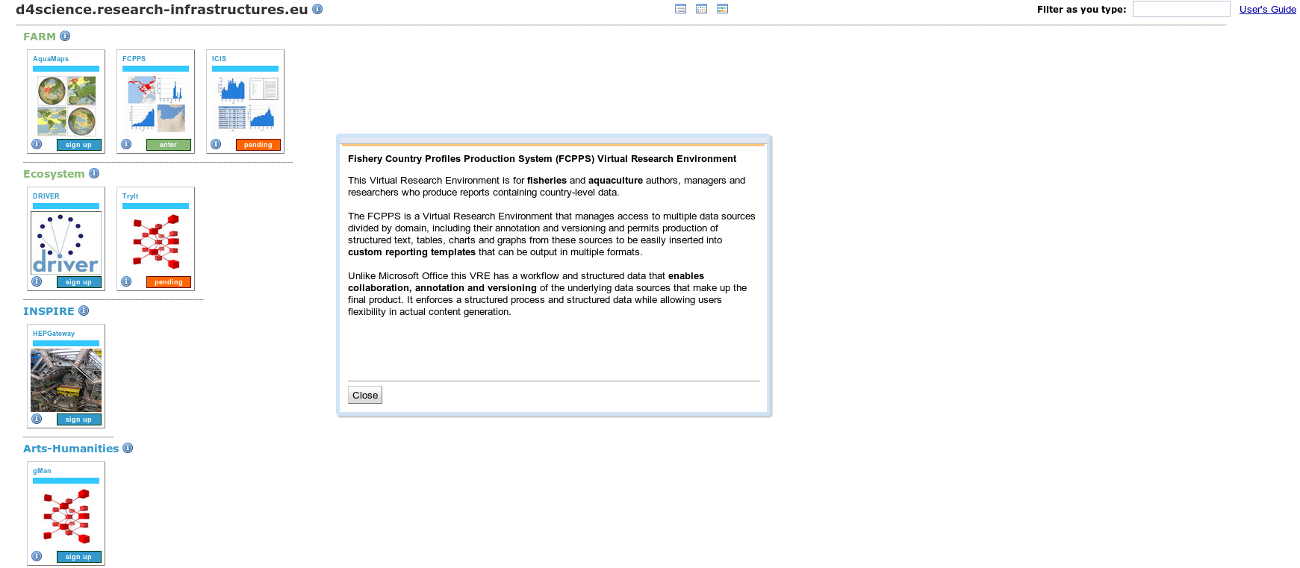
Once you have signed in to the portal, you can select one of the available VOs/VREs to work on.
Each VO is displayed with its name and under it you can see all the available VREs.
For each VO/VRE there are 3 status available:
- The green color, Enter: You have access to the corresponding VO/VRE
- The blue color Sign up: You don't have access but you can request for it
- The orange color Pending: Your request for access is not yet approved
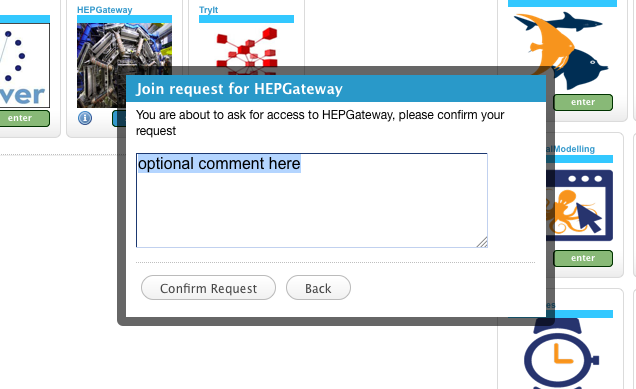
In order to sign up to a VO/VRE you have to click on it and a pop-up window appears. You can add any comment there for the administrator and then you click on the 'Confirm Request' button to submit your request
After your request is submitted the status of the requested VO/VRE is turned to orange until the administrator will approve your request
For every VO/VRE you can see some information by clicking on the information button.
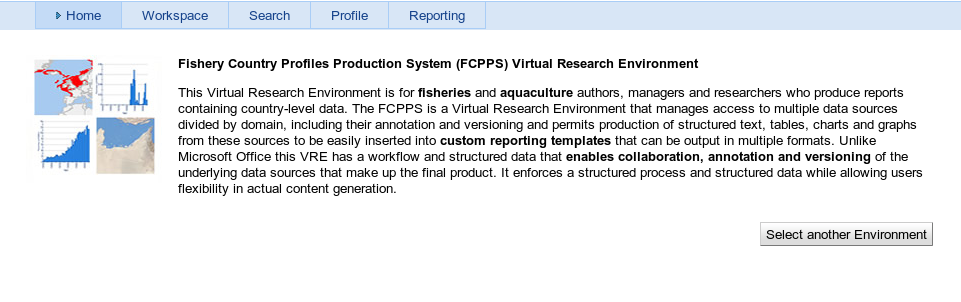
After logging in to a VO/VRE its description is displayed and all the available functionality divided into tabs and sub-tabs.
Search
See Search User Guide.
Annotations
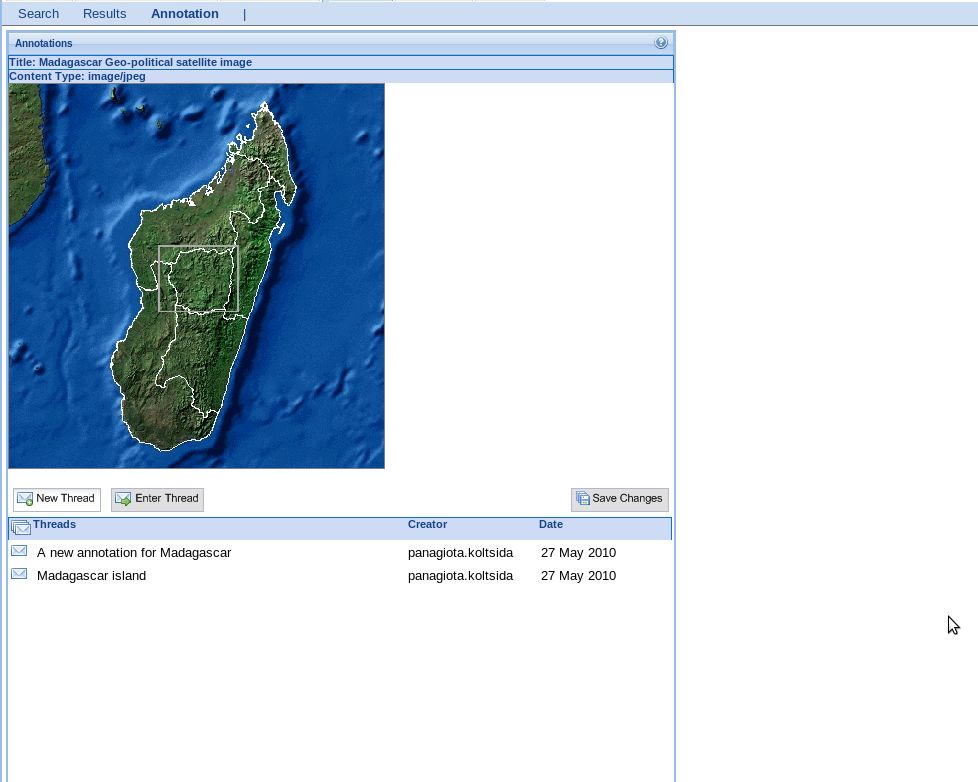
Annotations’ management is performed by the Annotation Portlet. This is a graphical user interface which provides an easy and sufficient way to annotate gCube information objects. Annotation Portlet can be invoked by selecting the “Manage Annotations” action among the actions associated with any item displayed in the Results portlet.
Then the user is moved to the annotation portlet where s/he is able to see the title, the mimetype, the content of the selected object as well as its annotations sorted by their creation date and grouped into threads.
Depending on the mimetype of the annotated object, the visualization of its content may differ.
In most cases, the content is displayed in a specified part of the portlet.
For a zip file, its entries are displayed and the user is able to download any of them.
Tiff images are transformed into a displayable format (png); video files are available only for download and the visualization of pdf files depends on the behavior of the browser (normally a plug-in is required).
On the other hand, the annotations are grouped into threads, shown up as a list where the title of each thread is the title of the first contained annotation.
The user can enter each thread and the annotations of this thread are displayed as a list where the title, their creation/ modification date and the author’s name are posted up.
The user is able to select which annotations (comments or associations) s/he wants to see just by clicking on it. The content of the annotations is shown at a pop up window where you can edit it. In the case of associations, the title of the associated object as well as a link to its content is displayed.
The user can either enter a selected Thread or create a new Thread by clicking on the corresponding buttons. By creating a new Thread a new annotation is actually created.
After entering a Thread the uses can add an annotation by clicking on the “Add” button and afterwards by filling in the title and text field, in the case of text annotations, or by filling in the title field and selecting an object existing in the basket as an associated object in the case of associations. S/he may also delete or edit an annotation.
All the changes made by the user are persisted when s/he presses the "Save Changes" button.
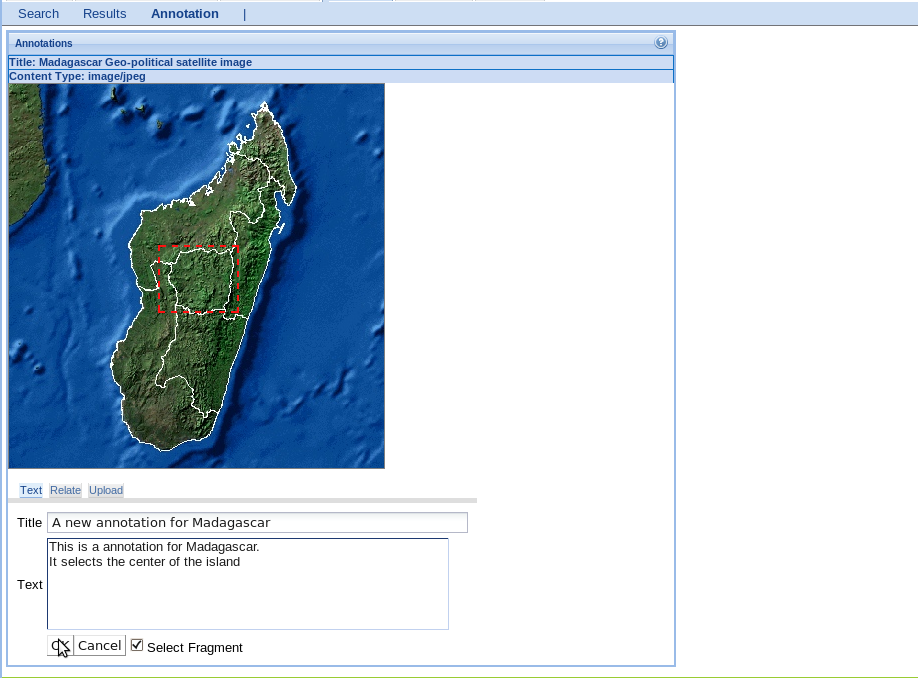
Annotation Portlet
When the object that is annotated is an image the user is able to add an annotation to a specific part of the image file. The user selects a space fragment and then he fills in the title and text fields. Then the space fragments are shown on the image and by clicking on one of them the content of the annotation is displayed.
New annotation with fragment
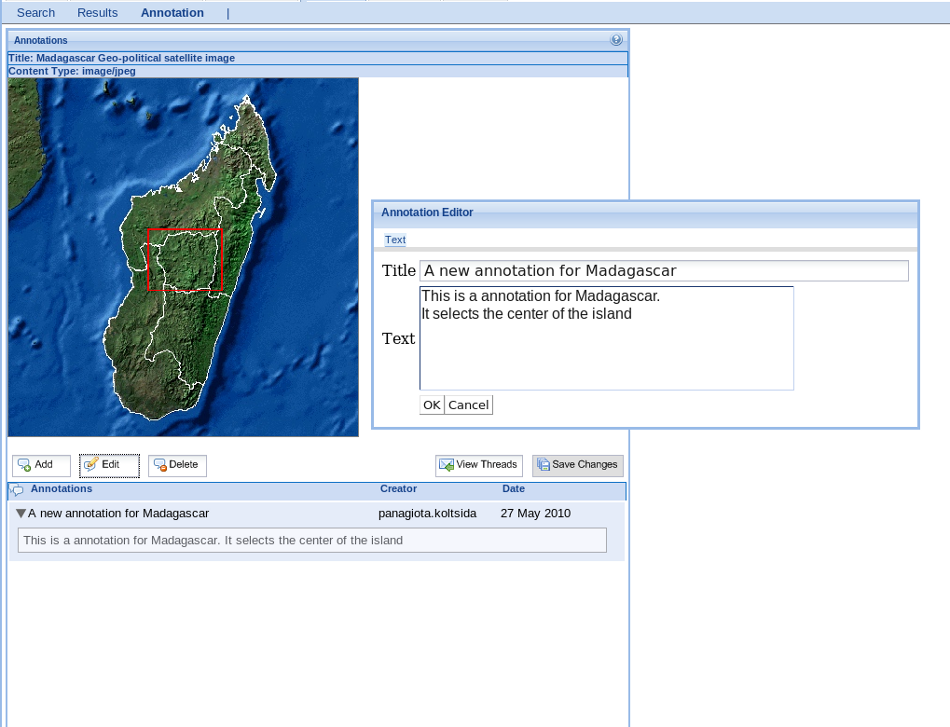
The user can edit an annotation be selecting the annotation s/he wants to edit and click on the "Edit" button. A pop up window appears with the content of the annotation
New annotation with fragment
Content Viewer
The content viewer portlet provides the functionality to view a gCube object and all its properties and transform it, if any transformation is available for the object's mime type.
Using this portlet you can:
- View the content of the selected object
- View the available metadata of the object
- View the aternative representations
- Transform the main object using any of the available transformation programs (if any) and save the result of the transformation as a new object
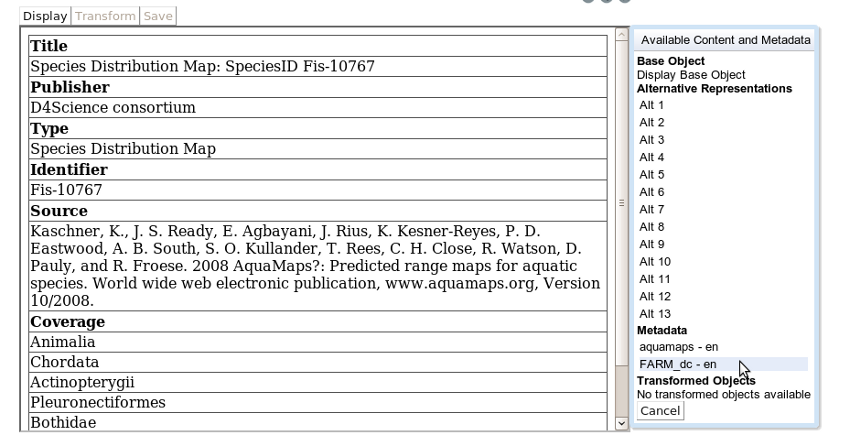
In order to use this portlet you should select from the results menu the Explore Object option for the object you would like to explore. After selecting this option you will be redirected to the Content Viewer portlet.
The main object is displayed as you can see at the image below
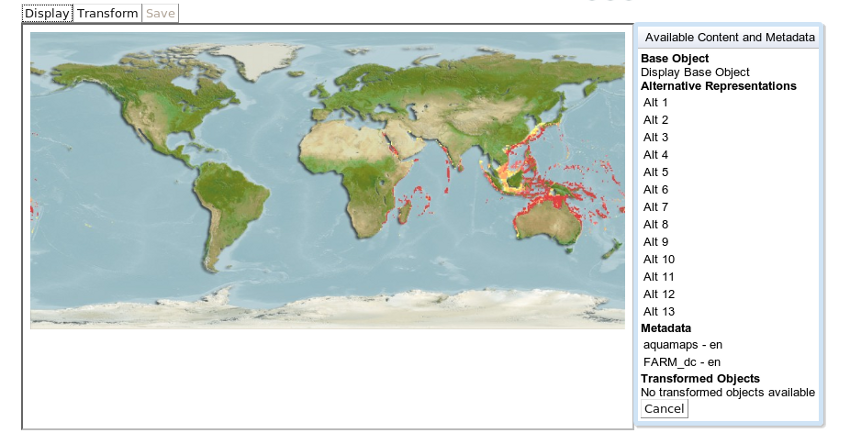
When you click on the Display button the pop-up window with the all the available properties for this object is displayed. You can select any of the available properties to view.
For example you can see at the image below the metadata at the FARM_dc schema for this object.
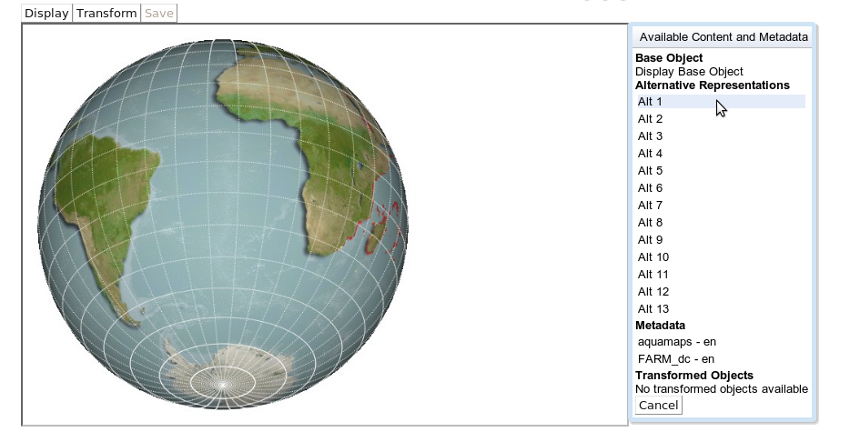
To view any of the alternative objects that are related to this object click on them
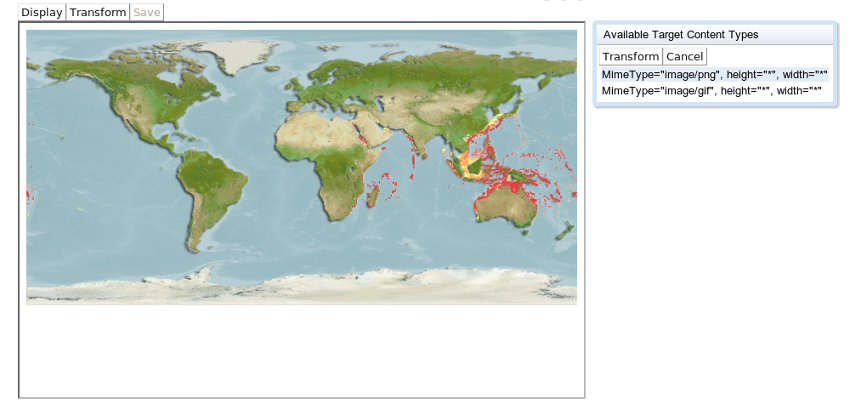
Transforming the selected object
Depending on the available transformations programs you can transform the object to a new object and save it.
In the example below the main object can be transformed to a new image with given height and width.
User Profile Management
The User Profile Management in gCube provides the functionality to the end-user to view and/or edit his/her profile.
User Profile Editing
The User Profile Editing portlet can be accessed by all users that have a portal account. Each user has his/her own profile and he/she can view and/or edit its content through this portlet.
By editing the profile's contents you have several options that affect the search results or the presentation of the results and their metadata.
- Edit your personal information
- Your fullname and email can be updated
- The username cannot be changed
- Personalize the presentation of the results and their metadata:
- For each available collection you can select any of the available presentable fields that will be used for the presentation of the results from the results portlet when this collection is used in search. If you don't select any field then all the available presentable fields will be displayed.
- For each available metadata schema you can select one of the available xslts that will be used for the presentation of the metadata. If you don't change anything the default XSLT will be used.
- A preview is displayed for the current selected schema and XSLT. This helps you to select the desired XSLT.
In order to apply the changes you need to click on the Save profile button. A message is displayed to inform you if the profile was successfully updated.

Report Management
See Report Management page.
Time Series
Click here to visit the Time Series portlet guide
AquaMaps Suite
The AquaMaps suite supports the production of AquaMaps and related data products, i.e. compound objects containing species and biodiversity occurrence predictive maps.
Click here to visit the AquaMaps Suite guide


